Ghost Manor
on Magazine Street
Behind the Scenes – The Fire Witch / Pumpkin Scene
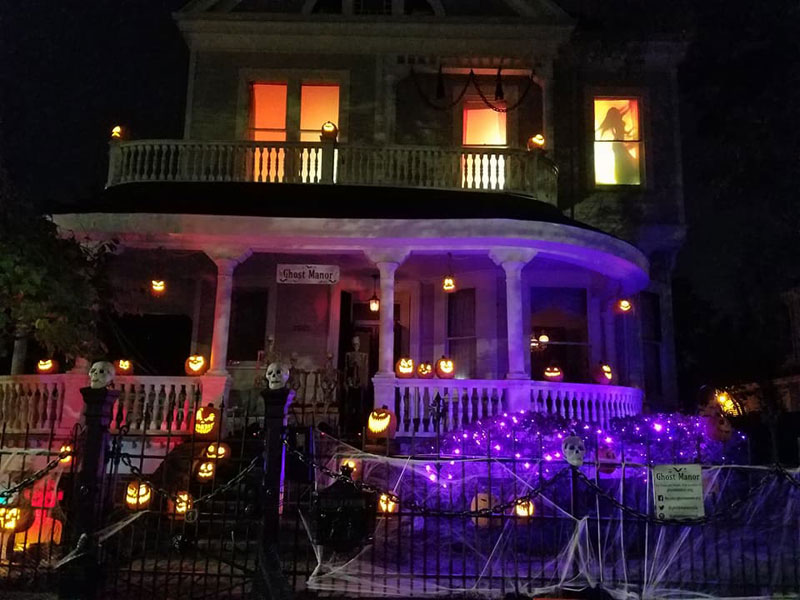
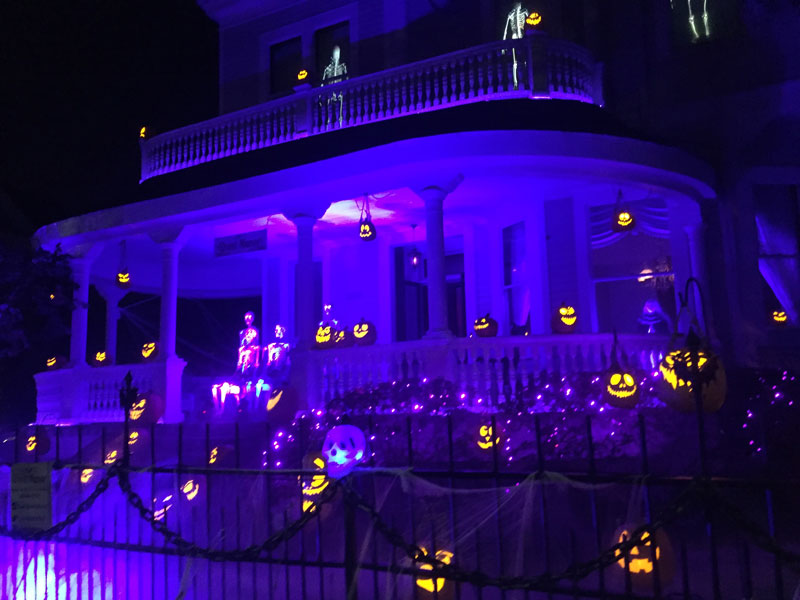
The Fire Witch and Jack-o-lanterns of Ghost Manor
The Inspiration
Last year, we added forty individually controlled jack-o-lanterns. We had thought about creating a scene with a lot of pumpkins for a while. But the ultimate inspiration came from watching the (excellent) 2007 movie Trick ‘r Treat, in which the yard of the character “Rhonda” had dozens and dozens of jack-o-lanterns and looked incredible. According to the director’s comments on the DVD, the set design for that scene was itself inspired by the original (1976) movie Carrie. A late pivotal scene shows Carrie’s mother’s house full of candles and then the whole structure burning down due to Carrie’s telekinetic powers. There’s something eerily beautiful about dozens of flames, each alive and moving independently.
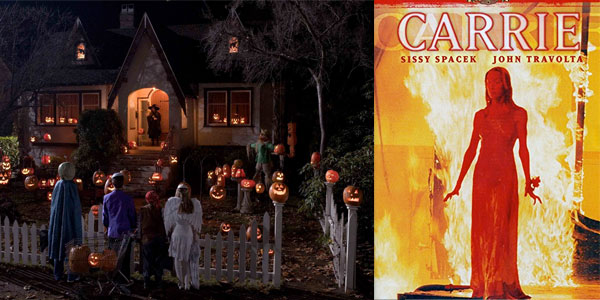
Left: Pumpkin house from Trick ‘r Treat. Right: Carrie
We also had another idea, one that we had started imagining the year prior but hadn’t yet fully developed. We wanted to add a witch scene. But not the green-lady-rides-a-broom kind of witch. We purchased some stock footage of the silhouette of a woman dancing slowly with a flowing shawl. We also bought footage of a bonfire and then composited the two so that the silhouette was superimposed in front of the flames looks to like a witch engaged in fire dancing ritual. We code-named her the “fire witch” and kept the scene on the back-burner until it could be fully developed. Along came the pumpkin scene idea, and the perfect opportunity came to merge the two.
The resulting scene: Creepy music starts playing and the fire witch appears, dancing to the music. The heat from the flames expands outwards. Each jack-o-lantern starts lighting, one by one, in sequence to the witch’s movement and the music, spreading outward across the house. It’s as if the “energy” she is emanating is lighting them. It’s an homage and subtle reference to Carrie spreading fire, and also a tribute to the scene in Trick ‘r Treat.
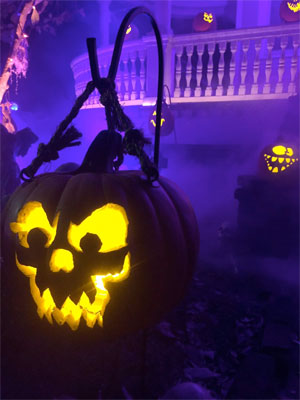
There are several distinct things about the jack-o-lanterns that are very important to the overall aesthetic. First, there’s a lot of them. Forty in all, and this year, we’re adding even more. We experimented with different layouts and found they worked best when placed more densely together. Second, they are all “traditional” jack-o-lanterns in which a fairly simple face is carved in the pumpkin, and the pumpkin itself acts like the head. Third, all forty of the carvings are different — they are hand-carved and there are no duplicates. Fourth, many of them are suspended from tree branches or shepherd’s hooks, put on railings or stands, or suspended from the porch trim; they are spaced out in three dimensions. Fifth, all of them operate independently. Each one flickers at its own rate.
The Build – Pumpkins!!!
We quickly dismissed the idea of using real pumpkins; they rot too fast, and in this climate, we wouldn’t even get an entire season out of them. Foam pumpkins have gotten very realistic, are carveable like real pumpkins, and potentially last many seasons. We compared several different brands and ultimately picked Funkins. They look the most realistic, and they have many good reviews about their quality. We purchased several different sizes, with the majority in the middle range. They carved beautifully.
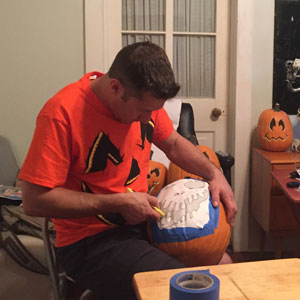
Friend of the Manor, Keith, beginning to carve.
We printed out dozens of templates, resizing in a graphics program where necessary. We cut off excess blank spots on the outer edge of the paper, then used blue painter’s tape to gently tape down the template, pleating the paper if needed to conform the flat sheet to the curve of the pumpkin. Instead of using the traditional “poking method” where you take a nail-shaped object and put hundreds of small holes along the outline of the pattern, we opted to use a box-cutter style razor knife to cut the outline of the template and pierce throughout the outside layer of the Funkin. This was much faster and produced very clean results. We then used basic “pumpkin saws,” both manual and electric, to cut out the pattern. It cut better than expected. There was some foam mess, but probably not as much as if we’d used a Dremel. Also, as compared to real pumpkins, these start out hollow, so there’s no mess to scoop out (but, alas, also no seeds to roast).
The next design challenge was mounting them. We knew we wanted them to be spread out vertically at various heights. Also, we didn’t want to put any on the ground, because they’re much harder to see, especially for children or when there’s a large crowd. We were able to put some of them on plant stands, on the porch steps, and on the railings. The rest we had to suspend. In locations that had nothing from which to hang them, we used shepherd’s hooks of various heights that we bought in the garden section of a big-box hardware store. While we were there, we got some natural jute rope to hang them. We wanted the frayed-natural twine to be part of the look.
Pumpkin hung from shepherd’s hook using jute rope.
How to attach the Funkins to the twine was the subject of much consideration. We thought about just drilling a hole through either the stem or the top of the pumpkin near the stem. But we often get thunderstorms, some of which can have up to 40+ mph wind gusts. We theorized that as they swayed in the wind, the twine would rub repeatedly on on the hole and cut into it, eventually causing it to fail. So we beefed it up by putting three black-oxide eyebolts (McMaster-Carr 9489T113) with a nut on the inside and a 1-in OD washer (McMaster-Carr 90377A126) on either side to spread out the load over a larger area of the pumpkin. The twine was then tied to the eyebolt, and any friction from the twine would only occur on the metal eye itself.
Light Sources
The next challenge was how to light them. We wanted them to be BRIGHT – much brighter than a single candle would provide. In addition, ideally, the light source would be amber in color, be comprised of multiple LEDs, run on 12 volts (like most of our other low-voltage systems), and be water-resistant. After brainstorming a bit, the first thing we came up with was motorcycle turn signals. They met all the requirements. The primary disadvantage was cost. Then we found the perfect solution: sidemarker lights for trailers/semis. They are shaped like a “puck” about 2.5 inches in diameter; they each contain 13 LEDs to make them bright; they’re amber, 12v, and water-resistant.
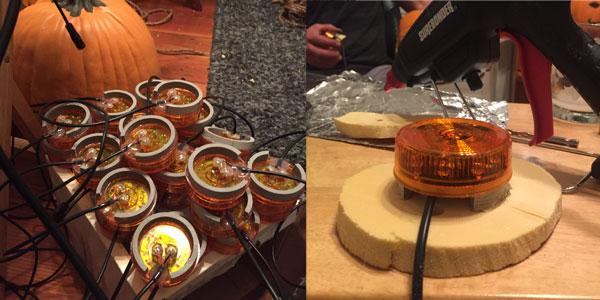
Left: Lighting “Pucks” with power pigtails. Right: Puck assembly hot-glued to pumpkin bottom.
To mount them to the pumpkins, we cut out a portion of the BOTTOM of the pumpkin. We didn’t want to cut the top, because we wanted to preserve the strength at the top to suspend them, and we also didn’t want gaps at the top in which even more water could possibly get in. We cut off about 1/4 inch of the end of a piece of plastic electrical conduit about the same diameter as the puck, cut a notch in conduit slice for wires to pass through, then hot-glued one side to the puck and the other side to the bottom piece of the pumpkin. Then we hot-glued the bottom piece back on to the pumpkin. It was fine to permanently attach it, because there’s no need to access the inside of the pumpkin again (no batteries inside, and the power pigtail extends to outside of the pumpkin). A hole 1/4-in hole was drilled in the bottom piece of each pumpkin to allow for drainage from rain that would inevitably blow into their mouths.
Wiring and Controlling The Pumpkins
Our lighting system is computer-controlled and mostly DMX-based. The challenge was to figure out a way to interface with forty pumpkins. Because the light pucks do not flicker, we decided to use individual flicker controllers, one for each pumpkin, inline with the power line and near the DMX board so they are out of the weather. We could have skipped the flicker controllers and programmed flicker effects manually via DMX, but making them all independent would have been time-consuming, used extra computing power, and would have been more difficult to scale.
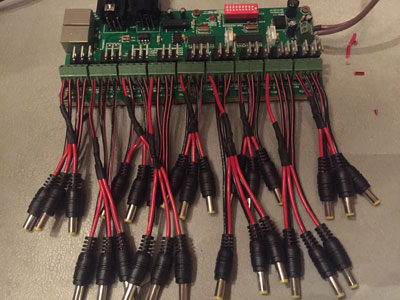
DMX Controller Board
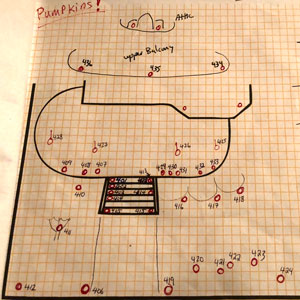
Pumpkin Site Plan
To turn them on and off individually, we used a 27-channel DMX board originally designed to run 9 RGB LED strips, along with a few other DMX RGB controllers to bring the total to 40. Although these DMX boards were originally intended to run LED strips, we found that by setting a channel to 100% or 0% worked fine in order to switch the pucks/flicker controllers on and off. We were able to avoid using relays which would have added cost and even more soldering. To reduce the amount of separate wires criss-crossing the yard, we decided to use standard CAT 6 computer networking cable as “snakes” that could each service 6 pumpkins. CAT 6 has 8 wires inside; we connected two of them to all of the commons and the other lead for each of the six to the remaining six wires. The end result is that we could run CAT 6 branches out to “hubs” in the yard with 6 pumpkins connected to each hub.
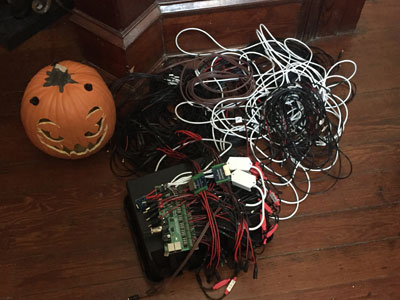
Lots of wires!
To make everything easier to store in the off-season, everything disconnects easily. A pigtail with a power jack at the end is soldered to each lighting puck. A matching plug is soldered to each branch wire which is then connected via screw terminals on the “hub” — a breakout board with an RJ45 jack to connect to the CAT 6 cable snake. The other end of the snake has another RJ45 breakout board connected to another pigtail jack to which the output of the flicker module connects. The input jack of the flicker module is connected to a pigtail plug, which is in turn connected to the DMX controller board. That’s a lot of connections! But the advantages are that everything separates and stores nicely; components can be replaced or rearranged easily; and if we need to relocate a cluster of pumpkins, we can do so easily by using a standard, off-the-shelf network cable that’s longer or shorter.
The Future
We plan to add even more pumpkins this year! Funkins are getting harder to find locally, but we’re hopefully going to get more soon. We’re also planning to offer some “make-and-take” classes where you can carve your own and take it home. Stay tuned!
The Jack-o-lanterns of Ghost Manor
Recent Comments